Installation d’une machine de dev Windows (avec WSL)
Ce qui sera installé
- WSL
- Visual Studio Code (fortement recommandé)
- Git
- zsh
- oh-my-zsh
- proto et node
- GitHub CLI
- pnpm
- docker
WSL
Lancer un powershell en tant qu’administrateur, puis lancer les commandes suivantes :
wsl --install Ubuntu-24.04

wsl --set-default Ubuntu-24.04

wsl --set-version Ubuntu-24.04 2

wsl --set-default-version 2
Plus d’info :
- https://learn.microsoft.com/fr-fr/windows/wsl/install
- https://learn.microsoft.com/fr-fr/windows/wsl/tutorials/wsl-containers
Visual Studio Code et les extensions recommandées
Télécharger VSCode
Paramètres
Ajouter ces paramètres (dans settings.json) :
  "editor.bracketPairColorization.enabled": true,
  "editor.codeActionsOnSave": {
    "source.fixAll": true,
  },
  "emmet.includeLanguages": {
    "vue-html": "html",
    "postcss": "css"
  },
  "emmet.syntaxProfiles": {
    "postcss": "css"
  },
  "emmet.variables": {
    "lang": "fr"
  },
  "eslint.format.enable": true,
  "eslint.validate": [
    "javascript",
    "typescript",
    "vue"
  ],
  "eslint.workingDirectories": [
    {
      "mode": "auto"
    }
  ],
  "workbench.sideBar.location": "right",
Extensions
Fortement recommandées
- Conventional Commits
- Dev containers
- Docker
- EditorConfig for VS Code
- ESLint
- Live Share
- Markdown All in One
- npm Intellisense
- Prisma
- Vue - Official
- Version Lens
- Vitest
- Vue Ecosystem Snippets
- vue-dsfr-snippets
Conseillées
- Database Client
- GitHub Actions
- GitHub Pull Requests and Issues
- GitLens -- Git supercharged
- Git Graph
- indent-rainbow
- REST Client
- UnoCSS
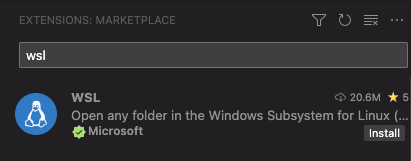
Ajouter l’extension wsl :
Git
Dans un terminal WSL :
sudo apt update
sudo apt install git
Configuration recommandée pour git :
[user]
  email = prenom.nom@interieur.gouv.fr # À changer!
  name = Prénom Nom                    # À changer!
[alias]
  aliases = !git config --get-regexp alias | sed -re 's/alias\\.(\\S*)\\s(.*)$/\\1 = \\2/g'
  ap = add -p
  br = branch
  bv = "br -vv"
  cb = "rev-parse --abbrev-ref HEAD" # *c*urrent *b*ranch
  ci = commit
  co = checkout
  cm = commit -m
  df = diff
  ds = diff --staged
  h = log --format='%C(yellow)%h%Creset %C(red)%d%Creset %s %Cgreen(%cr) %C(blue)<%an>%Creset' --graph
  last = !git --no-pager log -1 -p --stat HEAD
  l = log --graph --date=relative --pretty=tformat:'%Cred%h%Creset -%C(auto)%d%Creset %s %Cgreen(%an %ad)%Creset'
  lg = log --oneline --decorate --graph
  oops = commit --amend
  oopn = commit --amend --no-edit
  pf = push --force-with-lease
  sre = "!f() { git log -S$1 --pickaxe-regex ; }; f"
  st = status
  sw = switch
  s = switch
  sc = "switch -c"
  # Undo last commit but keep changed files in stage
  uncommit = reset --soft HEAD~1
  unstage = reset HEAD
  us = unstage
  untrack = rm --cache --
  root = rev-parse --show-toplevel
  cp = cherry-pick
  cpn = cherry-pick -n
  find = lg --grep
  review-local = "!git lg @{push}.."
  rs = restore --staged
  r = restore
[push]
  default = simple
[status]
  showUntrackedFiles = all
  short = true
[diff]
  # Use better, descriptive initials (c, i, w) instead of a/b.
  mnemonicPrefix = true
  # Show renames/moves as such
  renames = true
  tool = vscode
  wordRegex = .
[difftool "vscode"] # Utiliser vscode pour voir les différences entre des fichiers
  cmd = code --wait --diff $LOCAL $REMOTE
[branch] # Utiliser rebase au lieu de merge en tant que deuxième action de git pull
  autosetuprebase = always
  rebase = preserve
[credential]
  helper = cache --timeout=3600
[color]
  ui = auto
[rerere]
  enabled = true
[core]
  pager = less -Fr
  editor = code --wait
[init]
  defaultBranch = main
[fetch]
  prune = true
[grep]
  break = true
  heading = true
  lineNumber = true
  # Consider most regexes to be ERE
  extendedRegexp = true
[log]
  abbrevCommit = true
  # Automatically --follow when given a single path
  follow = true
[merge]
  # Display common-ancestor blocks in conflict hunks
  # conflictStyle = diff3
  # Disable fast-forward merges as default merge strategy.
  # Force explicit call of `git merge --ff …`.
  ff = false
[mergetool]
  # Clean up backup files created by merge tools on tool exit
  keepBackup = false
  # Clean up temp files created by merge tools on tool exit
  keepTemporaries = false
  # Put the temp files in a dedicated dir anyway
  writeToTemp = true
  # Auto-accept file prompts when launching merge tools
  prompt = false
[push]
  followTags = true # Envoyer les tags signés au push
[color "branch"]
  # Blue on black is hard to read in git branch -vv: use cyan instead
  upstream = cyan
[tag]
  # Sort tags as version numbers whenever applicable, so 1.10.2 is AFTER 1.2.0.
  sort = version:refname
ZSH
Installer zsh
sudo apt install zsh
chsh -s $(which zsh)
oh-my-zsh
sh -c "$(curl -fsSL https://raw.githubusercontent.com/ohmyzsh/ohmyzsh/master/tools/install.sh)"Autres configurations
Mettre ce contenu dans ~/.zshrc
# If you come from bash you might have to change your $PATH.
# export PATH=$HOME/bin:/usr/local/bin:$PATH

# Path to your oh-my-zsh installation.
export ZSH="${HOME}/.oh-my-zsh"

# Enable Powerlevel10k instant prompt. Should stay close to the top of ~/.zshrc.
# Initialization code that may require console input (password prompts, [y/n]
# confirmations, etc.) must go above this block; everything else may go below.
if test -n "${USE_P10K-}"; then
  if [[ -r "${XDG_CACHE_HOME:-$HOME/.cache}/p10k-instant-prompt-${(%):-%n}.zsh" ]]; then
    source "${XDG_CACHE_HOME:-$HOME/.cache}/p10k-instant-prompt-${(%):-%n}.zsh"
  fi
  ZSH_THEME="powerlevel10k/powerlevel10k"
else
  # Set name of the theme to load --- if set to "random", it will
  # load a random theme each time oh-my-zsh is loaded, in which case,
  # to know which specific one was loaded, run: echo $RANDOM_THEME
  # See https://github.com/ohmyzsh/ohmyzsh/wiki/Themes
  ZSH_THEME="agnoster"
fi

# Set list of themes to pick from when loading at random
# Setting this variable when ZSH_THEME=random will cause zsh to load
# a theme from this variable instead of looking in $ZSH/themes/
# If set to an empty array, this variable will have no effect.
# ZSH_THEME_RANDOM_CANDIDATES=( "robbyrussell" "agnoster" )

# Uncomment the following line to use case-sensitive completion.
# CASE_SENSITIVE="true"

# Uncomment the following line to use hyphen-insensitive completion.
# Case-sensitive completion must be off. _ and - will be interchangeable.
# HYPHEN_INSENSITIVE="true"

# Uncomment the following line to disable bi-weekly auto-update checks.
# DISABLE_AUTO_UPDATE="true"

# Uncomment the following line to automatically update without prompting.
# DISABLE_UPDATE_PROMPT="true"

# Uncomment the following line to change how often to auto-update (in days).
# export UPDATE_ZSH_DAYS=13

# Uncomment the following line if pasting URLs and other text is messed up.
# DISABLE_MAGIC_FUNCTIONS="true"

# Uncomment the following line to disable colors in ls.
# DISABLE_LS_COLORS="true"

# Uncomment the following line to disable auto-setting terminal title.
# DISABLE_AUTO_TITLE="true"

# Uncomment the following line to enable command auto-correction.
# ENABLE_CORRECTION="true"

# Uncomment the following line to display red dots whilst waiting for completion.
# COMPLETION_WAITING_DOTS="true"

# Uncomment the following line if you want to disable marking untracked files
# under VCS as dirty. This makes repository status check for large repositories
# much, much faster.
# DISABLE_UNTRACKED_FILES_DIRTY="true"

# Uncomment the following line if you want to change the command execution time
# stamp shown in the history command output.
# You can set one of the optional three formats:
# "mm/dd/yyyy"|"dd.mm.yyyy"|"yyyy-mm-dd"
# or set a custom format using the strftime function format specifications,
# see 'man strftime' for details.
# HIST_STAMPS="mm/dd/yyyy"

# Would you like to use another custom folder than $ZSH/custom?
# ZSH_CUSTOM=/path/to/new-custom-folder

# Which plugins would you like to load?
# Standard plugins can be found in $ZSH/plugins/
# Custom plugins may be added to $ZSH_CUSTOM/plugins/
# Example format: plugins=(rails git textmate ruby lighthouse)
# Add wisely, as too many plugins slow down shell startup.
plugins=(git)

source $ZSH/oh-my-zsh.sh

# User configuration

# export MANPATH="/usr/local/man:$MANPATH"

# You may need to manually set your language environment
export LANG=fr_FR.UTF-8
export LANGUAGE=fr_FR.UTF-8
export LC_ALL=fr_FR.UTF-8

# Preferred editor for local and remote sessions
export EDITOR='vim'

# Compilation flags
# export ARCHFLAGS="-arch x86_64"

# Keep 1000 lines of history within the shell and save it to ~/.zsh_history:
HISTSIZE=1000
SAVEHIST=3000
HISTFILE=~/.zsh_history

# Use modern completion system
autoload -Uz compinit
compinit

zstyle ':completion:*' completer _expand _complete _ignored _approximate
zstyle ':completion:*' group-name ''
zstyle ':completion:*' insert-unambiguous true
zstyle ':completion:*' list-colors ''
zstyle ':completion:*' list-prompt %SAt %p: Hit TAB for more, or the character to insert%s
zstyle ':completion:*' matcher-list 'm:{[:lower:]}={[:upper:]}' 'r:|[._- ]=** r:|=**'
zstyle ':completion:*' max-errors 2
zstyle ':completion:*' original true

zstyle ':completion:*' format 'Completing %d'
zstyle ':completion:*' menu select=2
if whence dircolors >/dev/null; then
  eval "$(dircolors -b)"
  zstyle ':completion:*:default' list-colors ${(s.:.)LS_COLORS}
  alias ls='ls --color'
else
  export CLICOLOR=1
  zstyle ':completion:*:default' list-colors ''
fi
zstyle ':completion:*:default' list-colors ${(s.:.)LS_COLORS}

zstyle ':completion:*' menu select=long
zstyle ':completion:*' select-prompt %SScrolling active: current selection at %p%s
zstyle ':completion:*' use-compctl false
zstyle ':completion:*' verbose true

zstyle ':completion:*:*:kill:*:processes' list-colors '=(#b) #([0-9]#)*=0=01;31'
zstyle ':completion:*:kill:*' command 'ps -u $USER -o pid,%cpu,tty,cputime,cmd'

if test -n "${USE_P10K-}"; then
  # To customize prompt, run `p10k configure` or edit ~/.p10k.zsh.
  [[ ! -f ~/.p10k.zsh ]] || source ~/.p10k.zsh
fi
Polices d’écriture
Installer la police JetBrains Mono.
Ajouter JetBrains Mono dans VS Code
Dans les paramètres de VS Code, ajouter les lignes suivantes :
"editor.fontFamily": "'JetBrains Mono', Consolas, 'Courier New', monospace",
"terminal.integrated.fontFamily": "'JetBrains Mono'",
D’autres polices :
proto
Les commandes suivantes doivent être exécutées dans WSL.
proto est un gestionnaire de toolchain unifié et pluggable. Il permet d'installer et d'utiliser la bonne version de node (et d'autres outils) par projet, sans installation globale. Plusieurs versions peuvent cohabiter.
Cet outil remplace avantageusement nvm, n ou volta : il détecte automatiquement la version à utiliser en parcourant les fichiers .prototools du répertoire courant et de ses parents.
Installer proto
bash <(curl -fsSL https://moonrepo.dev/install/proto.sh)Windows (PowerShell)
irm https://moonrepo.dev/install/proto.ps1 | iexUtiliser proto
Une fois proto installé, pour fixer la version de Node.js à utiliser pour le projet, il faut lancer la commande suivante à la racine du projet :
proto pin node ltsCette commande créera (ou mettra à jour) un fichier .prototools avec la version épinglée (vérifier la dernière version LTS sur nodejs.org) :
[tools]
node = "24.13.1"
On peut également épingler pnpm :
proto pin pnpm latestPour installer les versions épinglées :
proto installEnsuite, pour n'importe quel utilisateur qui a proto installé, dès qu'il se trouvera dans ce répertoire ou un de ses sous-répertoires, proto se chargera d'utiliser la version fixée dans le fichier .prototools.
Idéalement, il faut fixer la même version pour l'image Docker utilisée par les scripts CI que celle qui est fixée avec proto.
CI/CD
Pour utiliser proto dans une GitHub Action, on peut utiliser l'action officielle :
- uses: moonrepo/setup-toolchain@v0
  with:
    auto-install: true
GitHub CLI
La CLI GitHub permet de faciliter les interactions avec GitHub depuis le shell.
Installation pour Ubuntu et debian-based :
type -p curl >/dev/null || (sudo apt update && sudo apt install curl -y)
curl -fsSL https://cli.github.com/packages/githubcli-archive-keyring.gpg | sudo dd of=/usr/share/keyrings/githubcli-archive-keyring.gpg \
&& sudo chmod go+r /usr/share/keyrings/githubcli-archive-keyring.gpg \
&& echo "deb [arch=$(dpkg --print-architecture) signed-by=/usr/share/keyrings/githubcli-archive-keyring.gpg] https://cli.github.com/packages stable main" | sudo tee /etc/apt/sources.list.d/github-cli.list > /dev/null \
&& sudo apt update \
&& sudo apt install gh -y
Mise à jour :
sudo apt update
sudo apt install gh
Autres distributions : https://github.com/cli/cli/blob/trunk/docs/install_linux.md
Quelques exemple d’utilisation de GitHub CLI
S’authentifier
gh auth loginInstaller
gh auth loginCloner un dépôt
gh repo clone dnum-mi/vue-dsfrCréer un dépôt
gh repo createCréer une Pull Request à partir de la branche courante
gh pr createCréer une Pull Request à partir de la branche courante à fusionner dans la branche develop
gh pr create -B developBasculer sur la branche d’une PR
gh pr checkout 321Créer une issue
gh issue createpnpm
pnpm est le gestionnaire de paquets du registre npm qu’il est recommandé d’utiliser.
Ouvrir un powershell et lancer la commande suivante :
Using PowerShell:
iwr https://get.pnpm.io/install.ps1 -useb | iexPlus d’informations : https://pnpm.io/installation
Docker desktop
Installer docker dans WSL
Les commandes suivantes doivent être exécutées dans WSL.
Enregistrement du dépôt
Mettre à jour l’index des packages apt pour permettre à apt d’utiliser un dépôt en HTTPS :
sudo apt-get update

sudo apt-get install ca-certificates curl gnupg
Ajouter la clé officielle Docker
sudo install -m 0755 -d /etc/apt/keyrings

curl -fsSL https://download.docker.com/linux/ubuntu/gpg | sudo gpg --dearmor -o /etc/apt/keyrings/docker.gpg

sudo chmod a+r /etc/apt/keyrings/docker.gpg
Installer le dépôt
 echo \
  "deb [arch="$(dpkg --print-architecture)" signed-by=/etc/apt/keyrings/docker.gpg] https://download.docker.com/linux/ubuntu \
  "$(. /etc/os-release && echo "$VERSION_CODENAME")" stable" | \
  sudo tee /etc/apt/sources.list.d/docker.list > /dev/null
Note : Si vous utilisez une distro dérivée de Ubuntu, comme Linux Mint, vous aurez sans doute besoin d’utiliser
UBUNTU_CODENAMEau lieu deVERSION_CODENAME.
Installer le Docker Engine
Mettre à jour l’index des packages apt :
sudo apt-get updateInstaller Docker Engine, containerd, et Docker Compose.
sudo apt-get install docker-ce docker-ce-cli containerd.io docker-buildx-plugin docker-compose-pluginVérifier que docker fonctionne en lançant l’image hello-world
sudo docker run hello-worldVous devriez voir s’afficher le texte suivant :
Unable to find image 'hello-world:latest' locally
latest: Pulling from library/hello-world
70f5ac315c5a: Pull complete
Digest: sha256:926fac19d22aa2d60f1a276b66a20eb765fbeea2db5dbdaafeb456ad8ce81598
Status: Downloaded newer image for hello-world:latest

Hello from Docker!
This message shows that your installation appears to be working correctly.

To generate this message, Docker took the following steps:
 1. The Docker client contacted the Docker daemon.
 2. The Docker daemon pulled the "hello-world" image from the Docker Hub.
    (arm64v8)
 3. The Docker daemon created a new container from that image which runs the
    executable that produces the output you are currently reading.
 4. The Docker daemon streamed that output to the Docker client, which sent it
    to your terminal.

To try something more ambitious, you can run an Ubuntu container with:
 $ docker run -it ubuntu bash

Share images, automate workflows, and more with a free Docker ID:
 https://hub.docker.com/

For more examples and ideas, visit:
 https://docs.docker.com/get-started/
Plus d’info : https://docs.docker.com/engine/install/ubuntu/
Étapes de post-installation
Il faut maintenant faire en sorte de pouvoir utiliser docker sans utiliser sudo.
Créer le groupe docker
Créer le groupe docker :
sudo groupadd dockerAjouter votre utilisateur au groupe docker :
sudo usermod -aG docker $USERQuitter la session et rouvrez une nouvelle session pour que votre appartenance au groupe soit prise en compte, ou bien lancez la commande suivante :
newgrp dockerVérifier que vous pouvez lancer la commande sans sudo :
docker run hello-worldSi vous avez utilisé la CLI Docker avec la commande sudo précédemment, vous verrez peut-être l’erreur suivante :
WARNING: Error loading config file: /home/user/.docker/config.json -
stat /home/user/.docker/config.json: permission denied
Cette erreur indique que les paramètres de permission pour le dossier ~/.docker/ sont incorrects, parce que la commande a été utilisée avec sudo précédemment.
Pour corriger le problème, soit supprimez le dossier ~/.docker/ (il sera recréé automatiquement), ou bien changez les droits sur le dossier :
sudo chown "$USER":"$USER" /home/"$USER"/.docker -R

sudo chmod g+rwx "$HOME/.docker" -R
Plus d’info : https://docs.docker.com/engine/install/linux-postinstall/